How does Poor Man’s Load Balancer work?
 Natan Ferreira
- 0
- 107
Understanding the concept of Poor Man’s Load Balancer is an interesting and educational approach, especially for grasping the fundamentals of horizontal scalability using containers and load balancing. Horizontal scalability allows multiple container instances, and requests will be distributed by the Load Balancer. This model is widely used in high-demand environments.
Benefits:
- Capacity Increase: Adding new containers enables handling more simultaneous requests, improving application performance.
- Resilience: If a container fails, the load balancer redirects traffic to other active containers, increasing availability.
- Flexibility: It’s easy to add or remove containers as needed, allowing for quick adjustments to the environment.
Problems and Solutions:
- User Sessions: In applications with sessions, users may lose session data when redirected to different containers.
- Solution: Use a shared session store (like Redis) or configure sticky sessions in the load balancer.
- Data Synchronization: Changes to local data in one container are not automatically replicated to others.
- Solution: Utilize centralized databases and shared storage to ensure consistent data across containers.
- State and Log Management: Log and state monitoring become more complex as information is distributed across containers.
- Solution: Implement centralized monitoring and logging tools.
How does it work in practice?

We will have multiple containers, and the load balancer will know which one to send the request to. We will use Docker; if you have any questions, I have other posts explaining Dockerfiles and Docker Compose.
In the Docker Compose file, we don’t map the API ports because the load balancer will handle this. This is not a production-ready solution; it’s just for understanding how it works. We’ll use the Poor Man’s Load Balancer (DNS Round Robin).
This example is based on previous posts Docker Compose.
We will need a class to determine which container will handle the request.
import java.net.InetAddress;
import java.net.UnknownHostException;

import org.springframework.web.bind.annotation.GetMapping;
import org.springframework.web.bind.annotation.RestController;

@RestController
public class HostCheckController {

    @GetMapping("/hostcheck")
    public String checkHost() throws UnknownHostException {
        return InetAddress.getLocalHost().getHostAddress()
                + " - " + InetAddress.getLocalHost().getHostName();
    }

}
We need a reverse proxy, and we will use Nginx (HTTP server) for this purpose. We need to include it in the Docker Compose file. This way, we will have an HTTP container that balances incoming requests by routing them to one of the application container instances.
We need to specify an Nginx configuration file (nginx.conf) that will be used inside the Nginx container.
server {
	location / {
		proxy_pass http://company-api:8080;
	}
}
This configuration block makes Nginx redirect all requests to the root (/) to the company-api service on port 8080. This is useful in an environment where Nginx is used to distribute traffic among multiple services or containers, acting as a reverse proxy.
Now we need to create a Nginx image with the configuration we created. Let’s create a Dockerfile for this.
FROM nginx:1.19.6-alpine

RUN rm /etc/nginx/conf.d/default.conf

COPY nginx.conf /etc/nginx/conf.d/default.conf
The default configuration file is removed, and the created file is copied.
The files were created inside the root folder of the API, as shown in the image.

The reverse proxy block is as follows.
  company-proxy:
    build: ./nginx
    image: company-proxy
    ports:
      - "80:80"
    networks:
      - company-network
    depends_on:
      - company-api
This build is to create the image based on what we specified in the nginx Dockerfile we created. The image name is company-proxy, which runs on port 80 of both the container and the host. It needs to be on the same network as the API container and is a service dependent on the company-api container.
Now let’s take a look at the complete Docker Compose file.
version: "3.9"

networks:
  company-network:
    driver: bridge

services:
  company-mysql:
    image: mysql:8.0
    environment:
      MYSQL_ALLOW_EMPTY_PASSWORD: "yes"
    ports:
      - "3306:3306"
    networks:
      - company-network

  company-api:
    image: company-api
    command: ["/wait-for-it.sh", "company-mysql:3306", "-t", "30", "--", "java", "-jar", "api.jar"]
    environment:
      DATABASE_HOST: company-mysql
      SPRING_PROFILES_ACTIVE: development
    networks:
      - company-network
    depends_on:
      - company-mysql

  company-proxy:
    build: ./nginx
    image: company-proxy
    ports:
      - "80:80"
    networks:
      - company-network
    depends_on:
      - company-api
The Dockerfile and wait-for-it.sh are the same as in the previous posts.
Let’s generate a new image of the API because we made changes to the Docker Compose file and no longer specified a port for the API container.
I’ll generate the image using Maven, as discussed in a previous post.
mvn package -PdockerTo run by scaling the API container with 2 instances:
docker-compose up --scale company-api=2
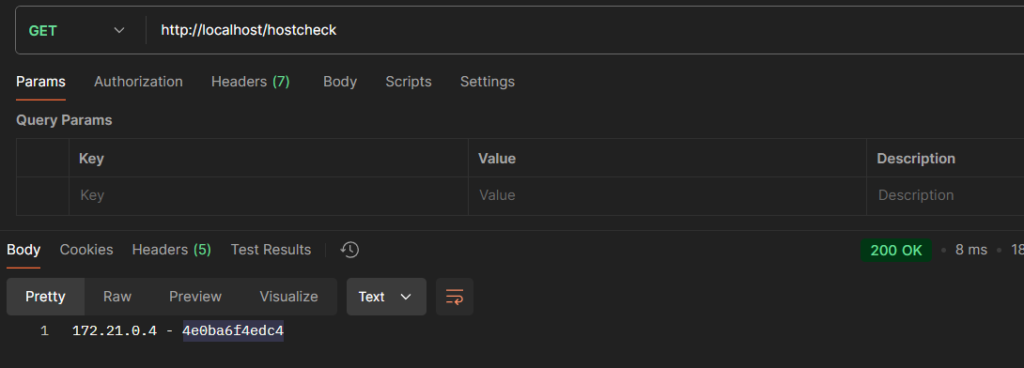
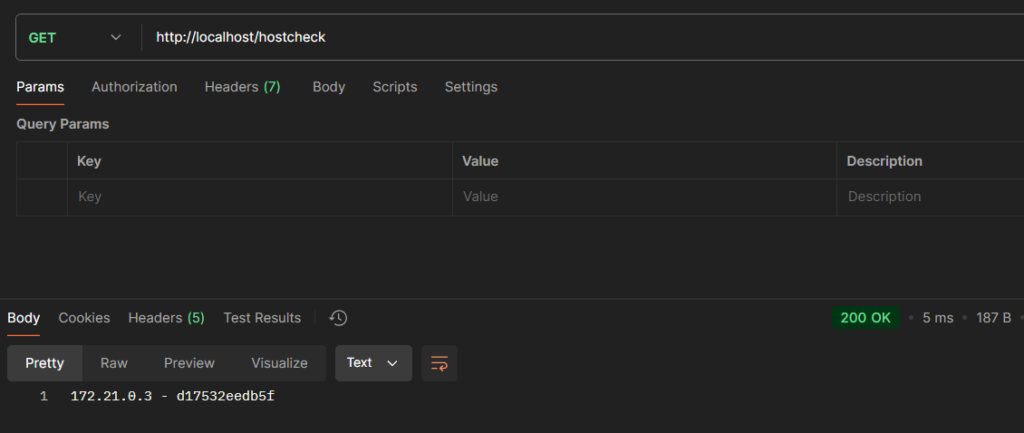
The two containers start, and when making requests to the API using port 80, we get the following results.


The hostcheck endpoint shows which container responded to the request.

Author
-

I am a seasoned Full Stack Software Developer with 8+ years of experience, including 6+ years specializing in Java with Spring and Quarkus. My core expertise lies in developing robust RESTful APIs integrated with Cosmos Db, MySQL, and cloud platforms like Azure and AWS. I have extensive experience designing and implementing microservices architectures, ensuring performance and reliability for high-traffic systems. In addition to backend development, I have experience with Angular to build user-friendly interfaces, leveraging my postgraduate degree in frontend web development to deliver seamless and responsive user experiences. My dedication to clean and secure code led me to present best practices to my company and clients, using tools like Sonar to ensure code quality and security. I am a critical thinker, problem solver, and team player, thriving in collaborative environments while tackling complex challenges. Beyond development, I share knowledge through my blog, NatanCode, where I write about Java, Spring, Quarkus, databases, and frontend development. My passion for learning and delivering innovative solutions drives me to excel in every project I undertake.
